Overview & End to end flow
The Send Payments Ecosystem is centered around the Accounts and Wallets architecture which enables real time tracking of users' funds in various currencies. All the processes within the Send Ecosystem are dynamic, Wallets and Transactions can be created in real time to support whatever your customer needs.
Customer Accounts are created and marked as either Individuals or Corporates. Each Customer Account is the backbone of the Send Ecosystem.
Wallets are connected to the Customer Account and can be held in up to 19 currencies to store value for your Customers. Each Customer Account can hold multiple Wallets in the same or different currencies.
Transactions are the mechanism to move money on the Send Platform. There are three major types of Transactions:
- PayIns
- Trades
- Payments (Transfers & Payouts)
PayIns are objects created by Send when a customer deposits funds onto their Wallet. Payins top up a wallets available balance allowing that wallet to settle Trades and Payments
Trades allow the customer to exchange one currency for another. The currency bought by the customer can be placed into a Wallet or sent to a Recipient.
Transfers are a type of Payment that allow the movement of funds between Wallets of the same currency. Transfers can be done between the Wallets of the same or different Customer Accounts.
Payouts are a type of Payment that allow the Customer to send money outside the Send Ecosystem to any Recipient and their Payment Address around the globe.
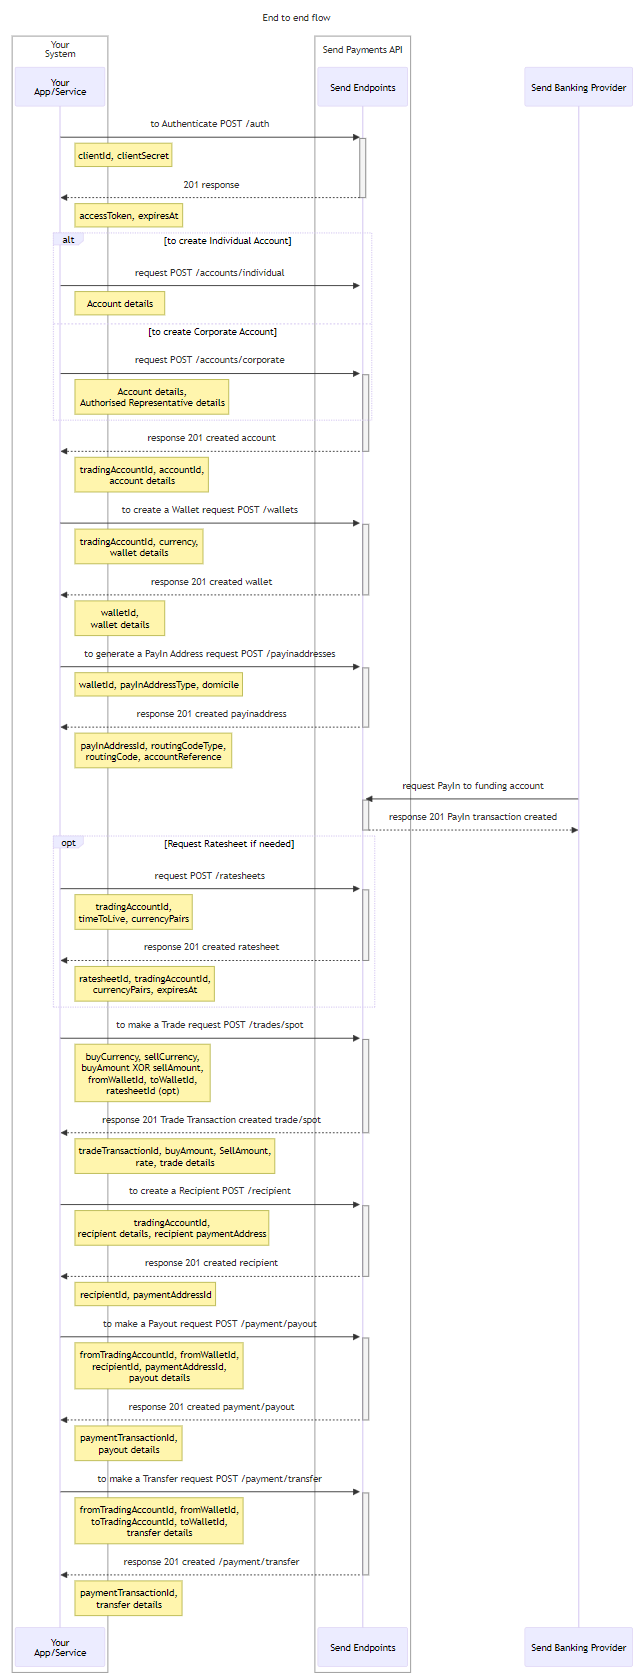
End to end flow
The typical Send Payments API end to end workflow involves the following steps:
1
Authentication
2
Setting up a Customer Account
3
Creating a Wallet and PayIn Address
4
Funding the wallet and thus creating a PayIn
5
Making a Trade
6
Creating a Recipient and Payment Address
7
Making a Payment (Payout or Transfer)
You can find a brief description of every step below and a more detailed one in the endpoint descriptions.
Sequencing
Each step in the flow can be completed in any order. However, there are some steps that require one or several steps to be taken beforehand (i.e. you need to create a Wallet before making a Trade).
For example, you could ask your customer to payin funds before booking a trade, or they could do this after trade booking. Additionally, you could create a recipient / payment address before booking the trade and then attach them to the trade directly, or they can be created after the trade.
Step 1 - Authentication
All interactions with the Send Payments API start with obtaining an Authentication Token, which is further referred to as an accessToken. Please keep in mind that you will need this to include this in all request headers to access the Endpoints, except the Authentication Endpoint itself.
You need to obtain a Client Identifier (clientId) from Send as part of onboarding. This is an environment specific user identifier for your API Account. The clientId will be set up a clientSecret and these will be shared with a nominated representative via a one time link. You should securely store your clientId and clientSecret and should not share these publicly.
To obtain an accessToken, your API will need to send a POST /auth request and if successfully authenticated, a response will be sent to you containing an accessToken which you will be able to use to sign all the subsequent requests, until the accessToken expires. If the accessToken expires then you'll need to repeat the Authentication process.
Now that you have an accessToken you can use this to access the endpoints offered by the Send Payments API.
Step 2 - Setting up a customer account
Account Endpoints can be used to register a new user with Send Payments.
There are 2 different Customer Account types Corporate and Individual.
Each Customer Account is the backbone of the Send Ecosystem and is used across the Platform to interact with the Endpoints.
In general, the Account creation process can follow two paths: Trusted Path or KYC Path.
Trusted path means Send have validated your AML/CTF/KYC policies and is confident they match or exceed those conducted by Send. In these cases created Accounts skip any checks made during the KYC Check and go straight to registered.
KYC Path means that Send will take responsibility for all the KYC procedures within the Account creation process. Send will run checks on all new accounts to ensure they are legitimate entities. The process for this is explained more in the Accounts Guide
To create an Account you need to send a POST /accounts/individual or POST /accounts/corporate request
to create an Individual or Corporate Account respectively.
In the response you will be assigned with the accountId which will be later used to link all the operations to your Account.
The accountId is used to fetch the account Object and is correlated with the identity of the Account Owner. It is the main ID used when making financial Transactions on the Platform and key in the other endpoints in the system.
Step 3 - Creating a Wallet
Wallets are currency specific virtual accounts which you can use to store funds, book Trades, make internal Transfers, external Payouts and more. Wallets are critical to the central funds management flow of the Send Payments Ecosystem.
To create a Wallet in any of the Available Currencies, you need to send a POST /wallets request. Within the request you need to specify the accountId of the Account for which the Wallet is created and also specify the wallet's currency, walletName and walletDescription.
In response your Wallet will be assigned with a walletId which will be used to refer to your Wallet.
Step 4 - Creating a PayIn Address
To receive funds onto the platform from an external source you will need to generate a PayIn Address for the Wallet. Each PayIn Address is unique to the Wallet. Each Transaction you make to a particular PayIn Address will be stored within the associated Wallet and can be referenced using payInTransactionId in GET requests.
To create a PayIn Address you need to send POST /payin-addresses request. The request must contain the walletId of the Wallet for which you are creating the PayIn Address. Besides that, the request should contain the payInAddressType (which can be either local bank transfer or international bank transfer).
Currently, all the PayIn Addresses are based in Australia and can be generated with either a BSB and Account Number or a SWIFT BIC and Account Number. However, we are working on additional domiciles. When sending funds, use "SendFX Limited" as the name of the account.
All the PayIn Addresses are NPP enabled.
In case of successful request you will be provided with payInAddressId and Payin Address details which can be used to send funds to your Wallet.
Step 5 - Making a PayIn
PayIn Transactions are created when a Customer sends money from their Bank to a previously generated PayIn Address.
After you make a PayIn to the Wallet’s Payin Address, we will send you a webhook (if these are setup) or you can poll the wallet. Please, make sure that the Wallet is Active before making a PayIn.
After the validation and Compliance Check, the PayIn Transaction will be credited, and the funds will be transferred to your Wallet, allowing you to make Trades and Payments.
Step 6 - Requesting a Ratesheet
Before booking a Trade you can request a Ratesheet. Requesting the Ratesheet will lock in a rate for the Client for a short period of time. That will guarantee that the Trade will be performed with exactly that locked rate. If a Ratesheet is not included in booking, then the real time rates will be applied for the Trade.
To fetch a Ratesheet you need to send a POST /rate-sheets request. In response you will receive a Rate specified for each currency pair you’ve requested.
Ratesheets are applicable for 2.5 minutes and their expiration time is explicit.
Rates are always represented as sellCurrency → buyCurrency.
For example, for a AUD → USD trade a 0.7 rate will indicate that for every 1 AUD you supply, you will get 0.7 USD.
Step 7 - Making a Trade
Trade is one of the crucial operations of the Send Platform. Trades allow the users to move their funds from one currency to another.
Trades are made between Wallets of different currencies within the same Customer Account. At the time of creating a Trade, funds can also be instructed to transfer to a Wallet in a different Customer Account or paid to an External Recipient once the trade has been completed.
To book and further perform a Trade you need to send a POST /tradess request. This request should include the currencies and amount of funds you are going to exchange and indicate the Wallets between which the Trade is performed.
After a round of checks Send will create a Trade Transaction and you will be provided with tradeTransactionId which can be used to refer to the Transaction. Once Transaction monitoring is completed the funds will be exchanged.
Step 8 - Creating a Recipient
Creating a Recipient with a Payment Address is mandatory in order to make a Payout to an External Person or Business. Each Recipient will be linked to the Customer Account you specify in the request.
When creating a Recipient, a Payment Address must be added within the request. If a Recipient has several Payment Addresses they can be added either when creating the Recipient or at a later point in time. The requirements for the Payment Addresses can vary based on the location and currency.
To create a Recipient, you need to send a POST /recipients request . In response you will be provided with the recipientId and paymentAddressId which can be used when making Payouts.
Step 9 - Making a Payment
Payments are one of the main features of the Platform. They can be used to either move money between Wallets (Transfers) or send money to a Recipient outside the Send Ecosystem (Payouts).
Transfers can be sent between the Wallets of different Customer Accounts or between the Wallets of the same Customer Account. These can be created by making a POST /payments/transfer request
To make a Payout you need to create a Recipient with a valid Payment Address and make sure that the Recipient and its Payment Address is Active. After that you need to send a POST /payments/payout.
In both cases (Payouts and Transfers) Send will process the data you’ve sent and will create a Payment Transaction. You will be provided with a paymentTransactionId that can be used to refer to that Payment Transaction. The Payment Transaction will then undergo a number of Compliance Checks and if the Transaction passes, the payment will be transferred to the Wallet or Recipient via established rails.
On this page
- Overview & End to end flow